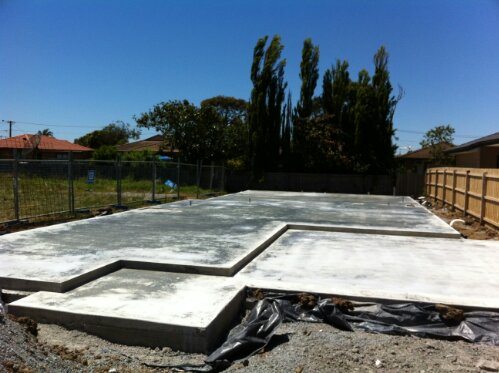
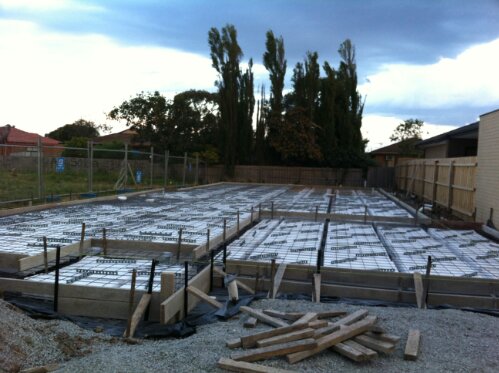
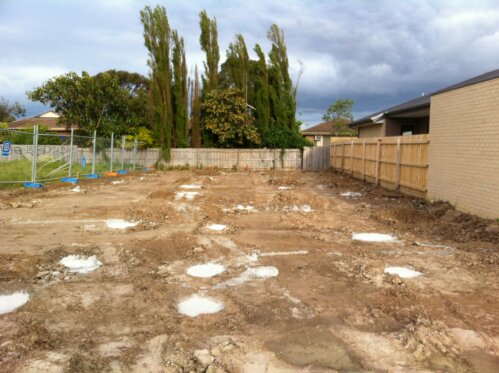
Concrete poured on 9th November.

Expecting the first progress payment from Metricon and first home buyer’s grant from government.
Concrete poured on 9th November.

Expecting the first progress payment from Metricon and first home buyer’s grant from government.

We did a site visit after work today, they have done the prep work for concrete. Great to see the boundaries of the house.
The concrete will be poured on Friday.

With my experience working with hundreds of handset vendors, Apple has been most challenging. This is not surprised since they took smart phone market in to a new era leaving competition light years behind. Market leaders such as Nokia had to leave Symbian behind and join forces with Microsoft. And handset manufacturers such HTC, LG and Samsung saw Google Android coming to their rescue.
Until Apple came with HTTP live streaming protocol with iOS 3.0, RTSP was the only supported live streaming for feature phone and early smart phones. It was built for real time delivery with all the tools needed to optimize fast delivery to end devices. RTP payload was on UDP and over the top session management was on TCP with HTTP like RTSP protocol. It was a nightmare for over the top providers who did not control the mobile network with NATing an Firewalls. But traditional telcos built their network around these challenges.
But Apple made it a level playing field with Apple HTTP live streaming protocol. Protocol is simple you chunk the live stream into small files, create a running playlist pointing links to the segments. Put a CDN infront to cache these playlists and segments. Everything is on network friendly HTTP.
It was great until Microsoft built Smooth and Adobe built HDS. The technology got fragmented with device specific deliveries. This became a nightmare for us. Supporting three different HTTP deliveries with layers of DRM technologies.
Now the industry is changing with MPEG releasing a standard which has a acronym of MPEG DASH.
It is an interesting time to be in the media delivery world, and very interested to see how big guns like Microsoft, Apple and Google play their cards.

Pipe work done, next slab
Josh gave a call on Friday. The slab will be poured on 7th and frame will be started on 14th. Which is really good. Nice to see things are moving quickly.
When we did the site visit it looked rooms are smaller than we thought, but we will go to display house and try to understand the dimensions.
At work, I have been asked to demo PPI (Pixels Per Inch) value on different video profiles and its effect on the iPad.
Well what is the PPI and how do you calculate that? It was quite simple at the end
W=Width of the video

H=Height of the video

S=diagonal size of the screen

PPI = SQRT(W^2+H^2)/S
Why does this matter? When video becomes available to handhelds such as tablets, broadcasters want to ensure that these new devices are not becoming a substitute to traditional broadcasting experience on large panels at your home. Thus PPI limitations are enforced to ensure video’s available on tablets are not mirrored to your TV screens at home.
A useful command to port mirror cisco 3750
Start Monitor
 conf t

monitor session 1 source interface Gigabit 1/0/x

monitor session 1 destination interface Gigabit 1/0/x
End Monitor
conf t

no monitor session 1

After two days of cleaning up. two trailer loads of rubbish and concrete
Finally after 7 months waiting time the site work has started on our new house.
Metricon has started work on 24th October with earth works as promised. To be honest this is the only thing they have done on time. Its an another story. We have been to the site almost everyday now.
24th October: Site start with scrape and leveling
25th October: Some new pegs, seems something has happened. but can’t figure out what!

27th October: We have electricity! Looks like some kind of piers has been installed and poured some concrete.
Our site supervisor Josh hasn’t called us yet, but it’s good to see something happening on the site.
Well I got this new IP Phone replacing our old PSTN phones. But the LCD screen on the phone looked bit boring.
There were few ideas how I can use this realestate to do something interseting.
My Ugly Bash Script
#!/bin/bash
text=`export http_proxy=http://xx.xx.xx.xx && /usr/local/extractSearch.pl`
convert -size 160x75 -monochrome -depth 1 -type Bilevel -gravity center caption:"Twitter Feed\n$text" /var/www/polycom/image.bmp

The Perl Script
#!/usr/bin/perl
# use module
use XML::Simple;
use LWP::UserAgent;
use Data::Dumper;
# create object
$xml = new XML::Simple;
my $url = "http://search.twitter.com/search.atom?q=<Your Query>&rpp=1&page=1&locale=en";
my $ua = LWP::UserAgent->new();
$ua->env_proxy;
$ua->agent('Mozilla/4.0 (compatible; MSIE 6.0; Windows NT 5.1)');
$ua->timeout(30);
$ua->default_header('pragma' => "no-cache", 'max-age' => '0');
my $res = $ua->get($url);
$data = $xml->XMLin($res->content);
print "$data->{entry}->{title}"
I found a very strange thing when I saw DNS queries for random servers on Wireshark. I am running Ubuntu 10.10 and I was pretty sure that no one is running malicious scripts on my Laptop. I was really worried when I saw DNS queries to http://www.ssa.gov and I had no idea what it was at the time. And when I googled to find out what it was the DNS queries increased.
So I had to get the bottom of this. “lsof” is a very useful program to see which process is responsible for the which network transaction. When I ran the following I found the culprit.
poo@SDT-TravelMate-8572G:~$ lsof -i udp
COMMAND PID USER FD TYPE DEVICE SIZE/OFF NODE NAME
firefox-b 1855 poo 42u IPv4 27548 0t0 UDP SDT-TravelMate-8572G:41473->dns1.xxx.com.au:domain
firefox-b 1855 poo 62u IPv4 27547 0t0 UDP SDT-TravelMate-8572G:35432->dns1.xxx.com.au:domain
firefox-b 1855 poo 63u IPv4 27556 0t0 UDP SDT-TravelMate-8572G:34421->dns1.xxx.com.au:domain
So the culprit is Firefox doing DNS pre-fetching. Interesting article on that
At work I have been given the task of coming up with a procedure of bare metal restore of redhat servers. There were two requirments.
1) Hot backing up
2) Remote restore
After some researching this is the procedure I came up with. Please bear in mind this procedure has only been tested in model enviroment and do your own homework before using this as your DR plan.
A) Backup
Backup the mbr and the bootloader. First 512 bytes of the primary HD contains the partion table and the bootloader. Here is the command for that.
dd if=/dev/sda of=/backup/mbr.img bs=512 count=1
Ensure that you have the backup directory and correct HD.
Now we need to backup the filesystem. Linux is dynamically creating the following directories. So no need to take the backup of them.
1) /sys
2) /proc
3) /var/run
4) /lost+found
5) /tmp
You need to exclude the backup directories. You can use tar or rsync to take the backup, however if you use rsync ensure you preserve symlinks and file permissions. Here is the command to create the tar archive.
tar cvfpz /backup/root.tar.gz –exclude=sys –exclude=proc –exclude=var/run –exclude=tmp –exclude=lost+found –exclude=backup /
Take a backup of the /etc/fstab and partion table info from the following command.
fdisk -l > /backup/fdisk.txt
B) Restore
Okay before restore lets crash the HD. Please beware this command shall ruin your HD, do not run this in the production enviroment.
dd if=/dev/random of=/dev/sda bs=512 count=100
Okay let’s start restoring.
You need a lInux live cd. Well I prefer a knoppix since it has all the useful tools.
Boot the server with the knoppix cd and restore the partion table. Since I am soundf this remotely I will be using iLo virtual media to mount the knoppix live cd.
dd if=/backup/mbr.img of=/dev/sda bs=512 count=1
Linux will not identify the HD until you reboot, however you can do the following as well. Run fdisk and write the partion table by pressing ‘w’.
Okay now let’s format the partions. This is where the copy of fstab helps. You can run the following command for each partion.
mkfs.ext3 /dev/sda2 -L /
mkfs.ext3 /dev/sda1 -L /boot
Now your partions are ready for the data. Let’s mount the devices. First create the mount point by running the following command. I am killing two birds with one command. I am creating rootfs and boot directories.
mkdir -p /rootfs/boot
Okay change directories, into cd /rootfs
Let’s extract the archive
tar xvzp /backup/root.tar.gz
Okay now we need to create the following directories.
mkdir /sys; mkdir /tmp; mkdir /lost+found; mkdir /proc; mkdir /var/run
Okay now you need to chroot into the /rootfs
mount -t proc /proc /rootfs/proc
mount -o loop /dev /rootfs/dev
chroot /rootfs -c /bin/bash
Now you have mounted the filesystem. Run the following command to reinstall grub
grub-install /dev/sda
Okay fingers cross you have recovered your crashed server. Reboot the box you have resurrected your Linux box.
Things you need to know. This won’t work if you have a LVM. If your fstab has uid rather than block devices, you need to change it to block devices.
If you have grub2 grub reinstallation might change a bit.
I will cover that in another post.
Okay something you might notice that I didn’t cover the backup directory. You have several options here. You can use a nfs or samba mount for that. Please keep in mind if you are using rsync as your backup method you cannot have the symlinks in a samba mount. So you need to use tar if you are using the samba option.
If you have a better way or see a mistake please comment.